Tool shopping for stained glass is genuinely confusing. Search for a beginner kit and you’ll find a $30 grab-bag of questionable quality, a $200 bundle with a useless iron, and fifteen forum threads where everyone disagrees. I put together this stained glass tools guide to cut through that: a clear, honest breakdown of every tool you actually need, what separates a good one from a waste of money, and real recommendations for each category. No padding, no upselling on things that don’t matter yet.
The Complete Stained Glass Tools List
Here’s the full stained glass tools list before the detail. Cutting needs a carbide glass cutter, running pliers, and breaker pliers. Soldering needs a temperature-controlled iron (80W minimum) and a heat-resistant work surface. Grinding: a glass grinder is the upgrade most beginners wait too long to buy. A carborundum stone handles small touch-ups manually, but don’t kid yourself that it replaces a grinder. Finishing rounds out with a fid, a flux brush, and finishing compound. That’s everything. The rest is specialty or can wait.
Stained Glass Cutting Tools
These are the essential stained glass tools you’ll use on every single piece you make. The cutter, the running pliers, the breaker pliers. They’re not exciting purchases, but they’re the ones that determine whether your glass breaks where you want it to.
Glass Cutter
A glass cutter scores the surface so the glass can be snapped cleanly along that line. It doesn’t cut through the way scissors cut paper. The actual break happens when you apply pressure along the score.
Two wheel types: steel and carbide. Steel is cheaper and dulls faster, especially with frequent use. Carbide holds an edge much longer and is worth the modest extra cost. Self-oiling models, where the handle reservoir feeds oil to the wheel automatically, are the standard for good reason. Remembering to oil manually mid-project is annoying, and dry scoring leads to bad breaks — the full technique for consistent scores is covered in our stained glass cutting guide.
Price range: $15 to $40 for a good carbide self-oiling cutter. Anything under $10 is false economy.
[AFFILIATE LINK: recommended glass cutter]
Running Pliers and Breaker Pliers
These two are often sold separately and frequently skipped by beginners. Don’t skip them.
Running pliers apply even pressure along a score line to start the break. They have a curved rubber face that distributes force so the glass snaps cleanly — our guide on how to use running pliers covers alignment, jaw adjustment, and when to use them vs. breaking by hand. Without them, you’re breaking glass by hand, which works sometimes but not on longer or more precise cuts.
Breaker/grozer pliers let you nibble away small amounts of glass and snap off awkward shapes along a score. They’re what you reach for when a piece is too small or oddly shaped to break by hand. You need both. Together they run $20 to $40.
[AFFILIATE LINK: running pliers]
[AFFILIATE LINK: breaker pliers]
Stained Glass Soldering Tools
Soldering Iron
This is where most beginners make their most expensive mistake: buying a cheap iron. The best soldering iron for stained glass isn’t the cheapest one that gets hot. It’s one that holds a consistent temperature under load.
Wattage matters more than most beginners expect. What watt soldering iron for stained glass do you actually need? 80W minimum. Lower-wattage irons, the kind sold in electronics kits, can’t sustain the heat needed to flow solder smoothly across copper foil. They cool mid-stroke, and the result is lumpy, dragged beads that look bad and are structurally weaker.
Temperature control is the other non-negotiable. Fixed-temperature cheap irons run too hot or cycle inconsistently. The Hakko FX-601 is the recommendation most hobbyists land on after going through cheaper options. It heats fast, holds temperature well under sustained use, and the dial is precise. I went through two cheap irons before buying one. Should have bought it first. Our stained glass soldering guide goes deep on iron selection, temperature settings, and technique if you want the full picture before spending anything.
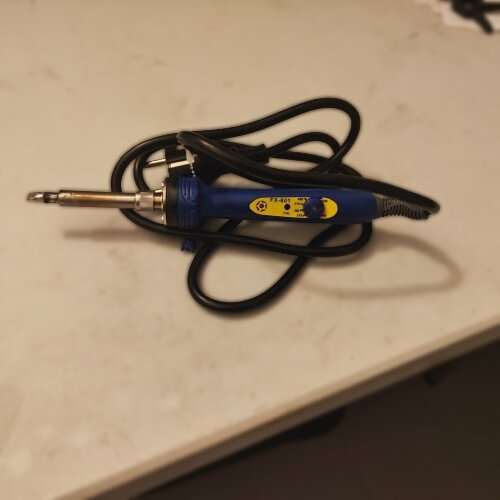
[AFFILIATE LINK: Hakko FX-601]
Soldering Surface
You need a heat-resistant, stable work surface. Glass panels shift while you solder and that ruins bead lines.
A homasote board is the standard: a dense cellulose fiber board that doesn’t char or conduct heat, pins easily for holding pieces in place, and is cheap at most hardware stores. Some people use a wood frame backed with drywall compound or a dedicated soldering mat. What you don’t want is bare wood, which will eventually scorch, or anything soft that lets the panel flex.
Stained Glass Grinding Tools
Glass Grinder
The best stained glass grinder is the tool that transforms what you can make. A grinder has a diamond-coated bit spinning in a shallow water reservoir — our guide to the best stained glass grinder for beginners breaks down what to look for at each price point. It lets you smooth edges, adjust fit, and grind curves that can’t be cut freehand.
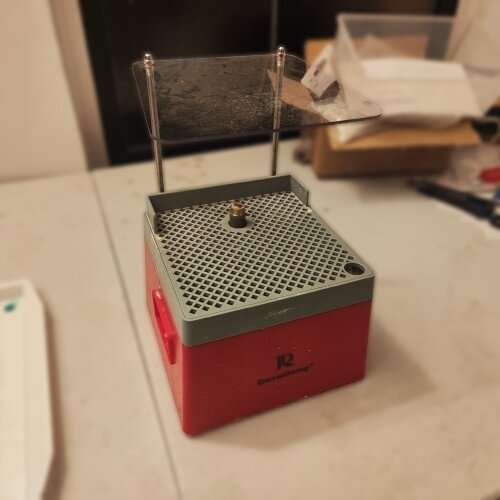
What to look for: a diamond bit with decent grit, a water reservoir large enough not to dry out mid-session, and a table surface big enough to support the glass piece you’re working on. For most beginner projects an 8″ or 10″ table is fine. Bigger tables and higher-end motors matter more as pieces get larger and more complex.
Most beginners delay buying a grinder to save money, then buy one a few projects in and immediately wonder why they waited. I did the same thing. Buy it sooner.
[AFFILIATE LINK: recommended beginner grinder]
Carborundum Stone
A carborundum stone is a manual alternative to a grinder: an abrasive block you use to smooth cut glass edges by hand. It works, slowly, and it handles small adjustments on edges that just need a touch of cleanup.
Honest assessment: it’s not a grinder replacement. Grinding a curved piece to fit a pattern by hand with a carborundum stone takes patience most beginners don’t have, and the results are less precise. It’s worth having as a backup or for tiny touch-ups, but don’t buy it expecting to skip the grinder indefinitely.
Stained Glass Finishing Tools
Fid / Burnisher
A fid is a small tool used to press copper foil flat against the glass surface after you’ve wrapped it. Most are plastic or wood with a rounded tip.
Without burnishing, foil lifts during soldering. The solder bonds to air instead of foil and the seam is weak and uneven. Takes about thirty extra seconds per piece and makes a real difference in seam quality. Fids are $5 to $10 and often included in starter kits.
Flux Brush
You apply flux to copper foil before soldering, and you need a brush to do it. A cheap chip brush or dedicated flux brush both work. What matters is that you apply flux consistently and reapply as it burns off.
Foam brushes hold too much liquid and make a mess. Stiff-bristle chip brushes are fine. Dedicated flux brushes with a short, firm handle give more control. Replace the brush when it gets too gunked up to apply evenly, which doesn’t take long.
Finishing Compound
After soldering, a finishing compound like Clarity removes flux residue from the glass surface and brings solder lines to an even sheen.
Apply it after the panel is washed and dried, buffed on with a soft cloth. The difference between an unfinished and a finished panel is visible. Flux leaves a film on the glass that dulls the color. A small bottle costs $10 to $15 and lasts a long time.
Best Stained Glass Starter Kits
If you want a single purchase to get started, a bundled kit can work. But only if you go in knowing what you’re actually getting. Most kits get the materials right and the iron wrong. Every time.
Kit 1: [AFFILIATE LINK: kit 1]
A typical budget bundle: cutter, running pliers, breaker pliers, copper foil, flux, and solder. The cutting and foiling supplies are usually decent. The iron is almost always the weak link: fixed temperature, underpowered, fine for a session or two before the inconsistency shows up. Good for someone who genuinely wants to try the hobby before committing, as long as they know going in that the iron will likely need upgrading.
Kit 2: [AFFILIATE LINK: kit 2]
Mid-range kits tend to include a better iron, sometimes temperature-adjustable. The iron upgrade is what you’re paying for here. Read actual reviews about the iron specifically, not just the kit overall. Some mid-range irons are a real improvement. Some are marginally better fixed-temperature irons dressed up with a dial. Best for beginners who want to take the hobby seriously from the start and don’t want to rebuild their kit after two projects.
Kit 3: [AFFILIATE LINK: kit 3]
Higher-end bundles occasionally include a proper grinder or a quality iron. When they do, the value is real. When they don’t include those things but charge as if they do, skip it and buy components separately. Best for someone ready to invest properly who wants a more complete setup without researching every piece individually.
One note that applies across all of them: the beginner stained glass toolkit that costs the least in the long run is the one with a real iron. A cheap kit iron will need replacing. Factor that into whichever kit you’re comparing.
Tools You Don’t Need Right Away
Before you start adding things to a cart, here’s what can wait.
Light table. Useful for seeing patterns through opaque glass, but a window works fine for most beginner projects. Buy it later if you find yourself working with dark opalescent glass regularly.
Lead came tools. Lead came is a different technique from copper foil. It uses H-shaped lead channels rather than tape and has its own set of tools: lead dykes, horseshoe nails, came cutters. You don’t need any of this unless you’re specifically learning the lead came method. Copper foil first.
Pattern shears. These are scissors with three blades that cut the exact width of copper foil into your pattern pieces. Useful at an intermediate level. For a first project, a regular marker and regular scissors work fine.
Lead-free solder. It sounds like a responsible upgrade, but lead-free solder melts at higher temperatures and is significantly harder to work with. Learn on 60/40 first. The amount of lead exposure from hobbyist soldering with good ventilation is low.
Soldering iron stand and tip cleaner. These cost almost nothing and come with most decent irons. If yours doesn’t include them, just buy any brass wool tip cleaner. Don’t spend time researching them.
Conclusion
Buy in order: cutter and pliers first, then a proper soldering iron, then a grinder as soon as the budget allows. Don’t try to have everything at once. Most people who buy a full kit in one go end up with decent materials and a bad iron, and it’s the iron that limits everything else. If you’re still figuring out where these tools fit into the overall process, our beginner’s guide to stained glass walks through everything from start to finish.
FAQ
What tools do I need to start stained glass?
The core list: a carbide glass cutter, running pliers, breaker pliers, a temperature-controlled soldering iron (80W minimum), copper foil tape, solder (60/40), flux, and a flux brush. Add a glass grinder as soon as budget allows. It’s not strictly required for a first simple project, but it makes everything from the second project onward much easier. A fid, finishing compound, and heat-resistant work surface round out the functional setup.
What is the best soldering iron for stained glass?
The Hakko FX-601 is the most consistently recommended iron for stained glass hobbyists. It runs at 80W, has precise temperature control, heats quickly, and holds temperature well under sustained use. Most cheaper alternatives run at inconsistent temperatures or lack adequate wattage, which results in lumpy, dragged solder lines. Budget irons work for a session or two before the limitations become obvious.
Do I need a glass grinder for stained glass?
Technically no. A carborundum stone can smooth edges manually. Practically, yes. A grinder lets you adjust glass pieces to fit your pattern precisely, handle curves you can’t cut freehand, and produce cleaner seams. Most beginners delay buying a grinder to save money, then buy one within a few projects and wonder why they waited. Buy it sooner.
What is the best stained glass starter kit for beginners?
The best starter kit is one that includes a quality iron, which most budget kits don’t. If the kit includes a temperature-controlled 80W+ iron, decent copper foil, solder, and flux, it’s a solid starting point. If the iron is fixed-temperature or underpowered, the kit is fine for materials but you’ll want to buy a better iron separately. Always check the iron specs before buying any bundle.