Starting stained glass is one of those hobbies where the more you research, the more overwhelmed and lost you feel. You find conflicting tool lists, expensive starter kits, and YouTube videos that assume you already know half the lingo.
So here’s what I wish someone had given me before I bought my first set of stained glass tools: a clear, honest breakdown of everything you need to start making stained glass art. From tools and materials to the actual process and costs.
In other words, if you’ve come here to find what do you need to start stained glass projects, you’re at the right place.
The Essential Tools for Stained Glass Beginners
You don’t need a studio full of gear on day one. But there are a few things you genuinely can’t skip, and a couple you’ll regret not having early. Here are the essential stained glass tools every beginner needs to understand before spending anything.
Glass Cutter
This is your most-used tool, so it’s worth getting right. A glass cutter scores the surface so you can snap along that line. It doesn’t cut through glass the way scissors cut paper.
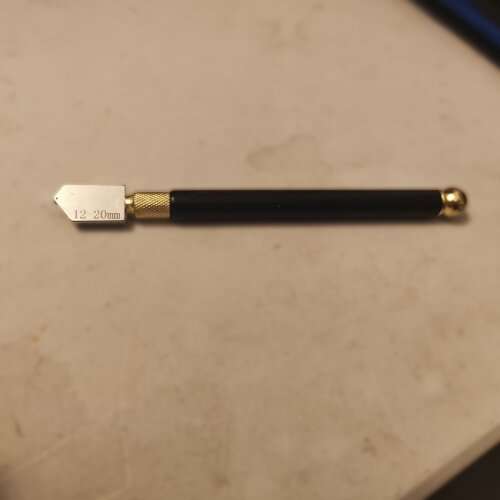
Two main types: steel wheel and carbide wheel. Go carbide. Steel wheels dull fast, especially when you’re practicing a lot. Self-oiling models (where the handle holds cutting oil) are worth the small extra cost. Dry scoring leads to bad breaks and wrecked wheels.
A pistol-grip or pencil-style cutter in the $15–$30 range works fine. Don’t buy the cheapest one at the hardware store, but don’t buy a $90 one either.
Running Pliers and Breaker Pliers
These two are almost always sold separately but used together. Beginners often skip one or both, which makes no sense given how cheap they are.
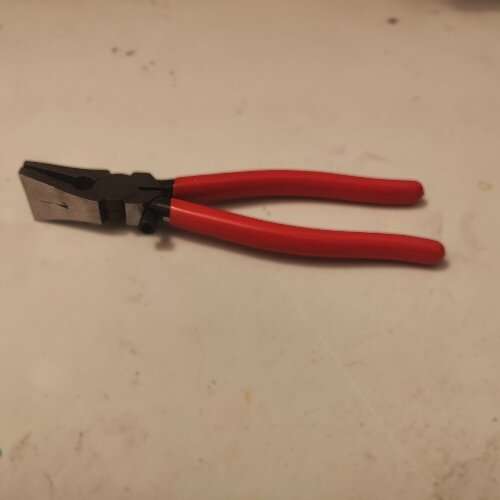
Running pliers apply even pressure along your score line to start the break. They look like wide-jawed pliers with a curved rubber face — and learning exactly how to use running pliers correctly is one of the fastest ways to stop getting inconsistent breaks. Without them, you’re snapping glass by hand, which works sometimes, not consistently.
Breaker/grozer pliers let you nibble away small pieces and break off awkward shapes along a score. They’re the tool you reach for when a piece is too small to snap cleanly by hand. You need both. They run $10–$20 each.
Soldering Iron
Once your glass pieces are cut and foiled, you’ll have to join them with solder and a soldering iron. The iron melts solder onto the copper foil seams to hold everything in place and create a unified object.
For stained glass, you want a dedicated glass-working iron, not your typical electronics iron. Temperature control matters a lot here, so don’t cheap out on your first big purchase.
Hakko FX-601 is what you want right off the bat. It will save you a ton of time early on. Going for a cheap soldering iron will make your experience miserable and will make you quit the hobby.
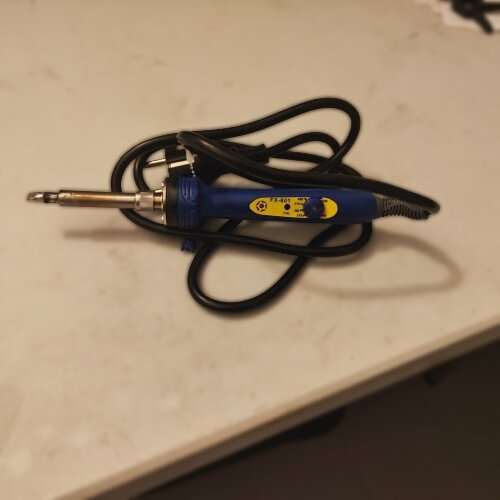
Yes, I am very passionate about this one: buy the Hakko right away, it’s worth it! Our stained glass soldering guide has a full breakdown of iron selection, temperature settings, and technique if you want to go deeper before buying.
Glass Grinder
Beginners consistently underestimate this one. A grinder has a diamond-coated bit that spins underwater, letting you smooth and reshape the edges of cut glass pieces so they fit your pattern precisely.
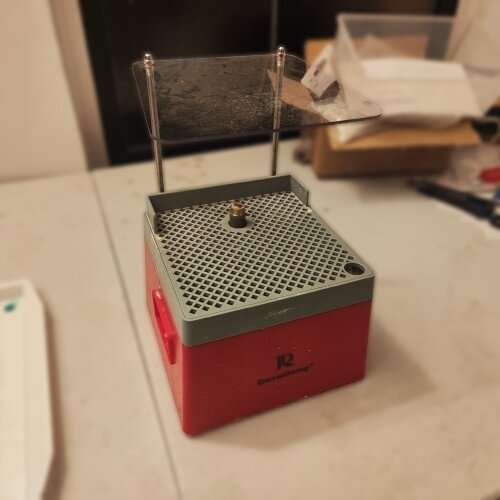
No matter how good your scoring gets, cuts aren’t always perfect. Gaps between pieces make soldering messy and weaken the finished piece. A good stained glass grinder fixes that without making too big of a dent in your pocket — a starter model should set you back roughly $50 to $80.
It also handles curves you can’t cut freehand. I’d put this on the “buy sooner than later” list. Trying to grind by hand with a carborundum stone is slow and frustrating in a way that makes you want to quit the hobby.
Light Table
A light table is a flat surface lit from below. It makes it easier to see your pattern through the glass while you cut. Not strictly essential for very simple geometric projects, but it speeds things up and reduces errors when you’re working with colored glass that’s hard to see through.
A window works in daylight. A cheap LED tracing pad ($20–$40) works for most beginner projects if you want something dedicated.
What Do You Need to Start Stained Glass in Terms of Materials
Stained Glass Sheets
Glass comes in a huge range: cathedral (transparent), opalescent (semi-opaque), textured, streaky, and more. For a first project, stick to cathedral glass in solid colors. It’s easier to score and easier to see through when tracing patterns.
Buy small sheets to start. You’ll break more than you expect while learning. Most hobby shops sell offcuts and sample packs. Avoid anything described as “hard” or “art glass” until you’ve got the basics down.
Glass prices vary too much to quote here. Supplier, location, and type all play a role. Buy small until you know what you’re working with.
Copper Foil Tape
The Tiffany-style copper foil technique uses copper foil tape wrapped around the edge of each glass piece. Solder bonds to this foil, joining the pieces together.
The most common width for beginners is 7/32″, which works for most standard glass thicknesses. Foil comes with copper, silver, or black backing. Copper-backed is the standard choice unless you want a specific look on your finished seams.
Solder
Two common blends: 60/40 (60% tin, 40% lead) and 50/50. The 60/40 flows smoother and is easier to work with when you’re learning. Some people use 50/50 to fill in seams and 60/40 to finish the bead on top. One spool of 60/40 is fine to start.
Aim for 2mm to 3mm solder, depending on the size and complexity of your design.
Flux
Flux is a chemical you brush onto copper foil before soldering. Without it, solder won’t bond properly. It beads up and rolls off. This is the thing beginners skip and then blame their iron for. Don’t skip it.
Use a gel or liquid flux made for stained glass, not plumbing flux. Wash your finished piece thoroughly afterward. Flux residue causes corrosion over time.
Patina
Patina is optional. It’s a chemical solution that turns your solder lines from shiny silver to copper or black, giving the piece a more finished, aged look. Most beginners don’t bother on their first project, but it takes about five minutes and makes a real visual difference.
How the Stained Glass Making Process Actually Works
The stained glass making process follows a clear sequence. Knowing it upfront makes every individual step make more sense.
Step 1: Choose a Pattern
Start with something simple: geometric shapes, minimal curves. Print or trace it at the correct size.
Step 2: Cut the Glass
Score and snap each piece to match the pattern shapes. This takes practice, and you will break things. Our complete guide to cutting stained glass walks through every technique you need, from scoring to breaking curves cleanly.
Step 3: Grind the Edges
Run each piece along the grinder to smooth edges and adjust fit. Pieces should sit close together without gaps.
Step 4: Apply Copper Foil
Wrap each piece individually, centering the foil on the edge and folding it over both sides. Burnish it flat with a fid or your fingernail.
Step 5: Solder
Flux the foil, then run solder over every seam, building up a rounded bead.
Step 6: Finish
Clean off flux residue, apply patina if you want it, and polish with finishing compound.
That’s the stained glass step by step in plain terms. Each stage has a learning curve, but nothing is technically difficult. Just unfamiliar at first. The whole process clicks after you finish your first piece.
How Much Does It Cost to Start Stained Glass?
The cost to start stained glass depends on how you want to set up.
Bare minimum (~$150–$200)
- Glass cutter: $25
- Running pliers + breaker pliers: $30 combined
- Soldering iron: $85
- Glass sheets, foil, solder, flux: $30–$50 for a small project
This gets you through a first project. You’ll be grinding by hand and improvising in places, but it works.
Comfortable starter setup (~$320–$420)
- Everything above plus:
- Glass grinder ($120–$160)
- Light table ($30–$50)
- A wider range of materials to experiment with
If you’re looking at bundled options, our stained glass tools guide breaks down the best starter kits in detail, including what each one gets right and where they cut corners on the iron. Where to spend more: the grinder and the iron. Where to save: glass (buy offcuts to start), and basic pliers (brand doesn’t matter much here).
What Should Your First Stained Glass Project Be?
Small and geometric. A piece with four to eight straight-edged shapes is a realistic first project. Think a simple panel, a basic diamond sun catcher, or a stylized leaf with minimal curves.
Complexity kills motivation early on. If your first project has twelve tight curves and small pieces that need precise grinding, you’ll spend your time frustrated rather than learning. The skills build fast. Give yourself a project where you actually finish, hold it up to the light, and want to make another one.
Avoid circles, tight concave curves, or anything with pieces smaller than about 1.5 inches. Those will come later.
Common Stained Glass Mistakes Beginners Make
These are the common stained glass mistakes worth knowing before you start. Not generic warnings, but actual things that will derail a session.
Scoring too light or too hard. A score should make a soft hissing sound as you drag the cutter. Not a scrape, not silence. Too much pressure chips the glass; too little and it won’t break cleanly.
Not using oil. Dry scoring dulls your cutter wheel fast and leads to inconsistent breaks. Oil the wheel every few cuts.
Skipping the grind. Pieces that don’t fit properly produce bad seams. Gaps don’t disappear under solder. They just fill with an ugly blob. Fit every piece before you foil it.
Rushing the foil. Foil that isn’t properly centered or burnished lifts during soldering. Take the extra thirty seconds to seat it.
Running the iron too hot. Solder that’s overheated goes thin and runny. The seam looks pitted and dull. The iron should melt solder smoothly, not instantly.
Skipping the wash. Flux residue left on the piece corrodes your solder lines over weeks. Wash with soap and water as soon as you’re done.
Things I Wish I Knew Before Starting Stained Glass
Glass breaks on its own schedule. You’ll do everything right and it’ll snap wrong anyway. This happens to people who’ve been doing this for years. Budget for waste, especially on curved cuts.
Your first solder lines are going to look bad. This is fine. Smooth, rounded beads take time to develop. Don’t judge the craft on your first session.
I started off with a cheap generic 40W soldering iron and thought I was horrible at soldering. Turns out I just needed a Hakko. Worst thing is, it took me 2 months to buy it.
I held off buying a grinder for two months to save money. That was a mistake. The day I got one, the whole thing opened up. Buy it sooner than feels necessary.
Pattern choice matters more than skill at the start. I spent twice as long on a project with tight curves than I needed to, when a simpler shape would have taught me the same fundamentals and felt less like a fight. Geometric first. Always.
The flux fumes are real. Work near a window. I spent a long session in a poorly ventilated room and left with a headache I chalked up to concentration. It wasn’t concentration.
Six months in, I was doing things I assumed were years away. The basics aren’t complicated. They’re just new. That gap closes faster than you’d expect.
Frequently Asked Questions
Can I start stained glass without a grinder?
Yes, but it will limit you. You can smooth edges by hand with a carborundum stone, but it’s slow and imprecise. A grinder makes every other step easier and is worth buying early.
What is the easiest stained glass technique for beginners?
The copper foil method (Tiffany technique) is the most beginner-friendly. It’s forgiving, works with small pieces, and doesn’t require the precision that lead came does.
How long does it take to learn stained glass?
Most beginners finish a simple first project in a weekend. Consistent results with soldering and cutting come after a few projects, usually within the first month of regular practice.
Do I need a lot of space to do stained glass?
A sturdy table about the size of a desk is enough to start. You’ll want good ventilation for soldering and a nearby outlet. A dedicated workspace helps but isn’t required.
Conclusion
You don’t need a full setup to start. A cutter, pliers, a good iron, and basic materials will carry you through a first project. Add the grinder as soon as you can justify it. Once cutting and soldering start clicking, everything else is refinement.